


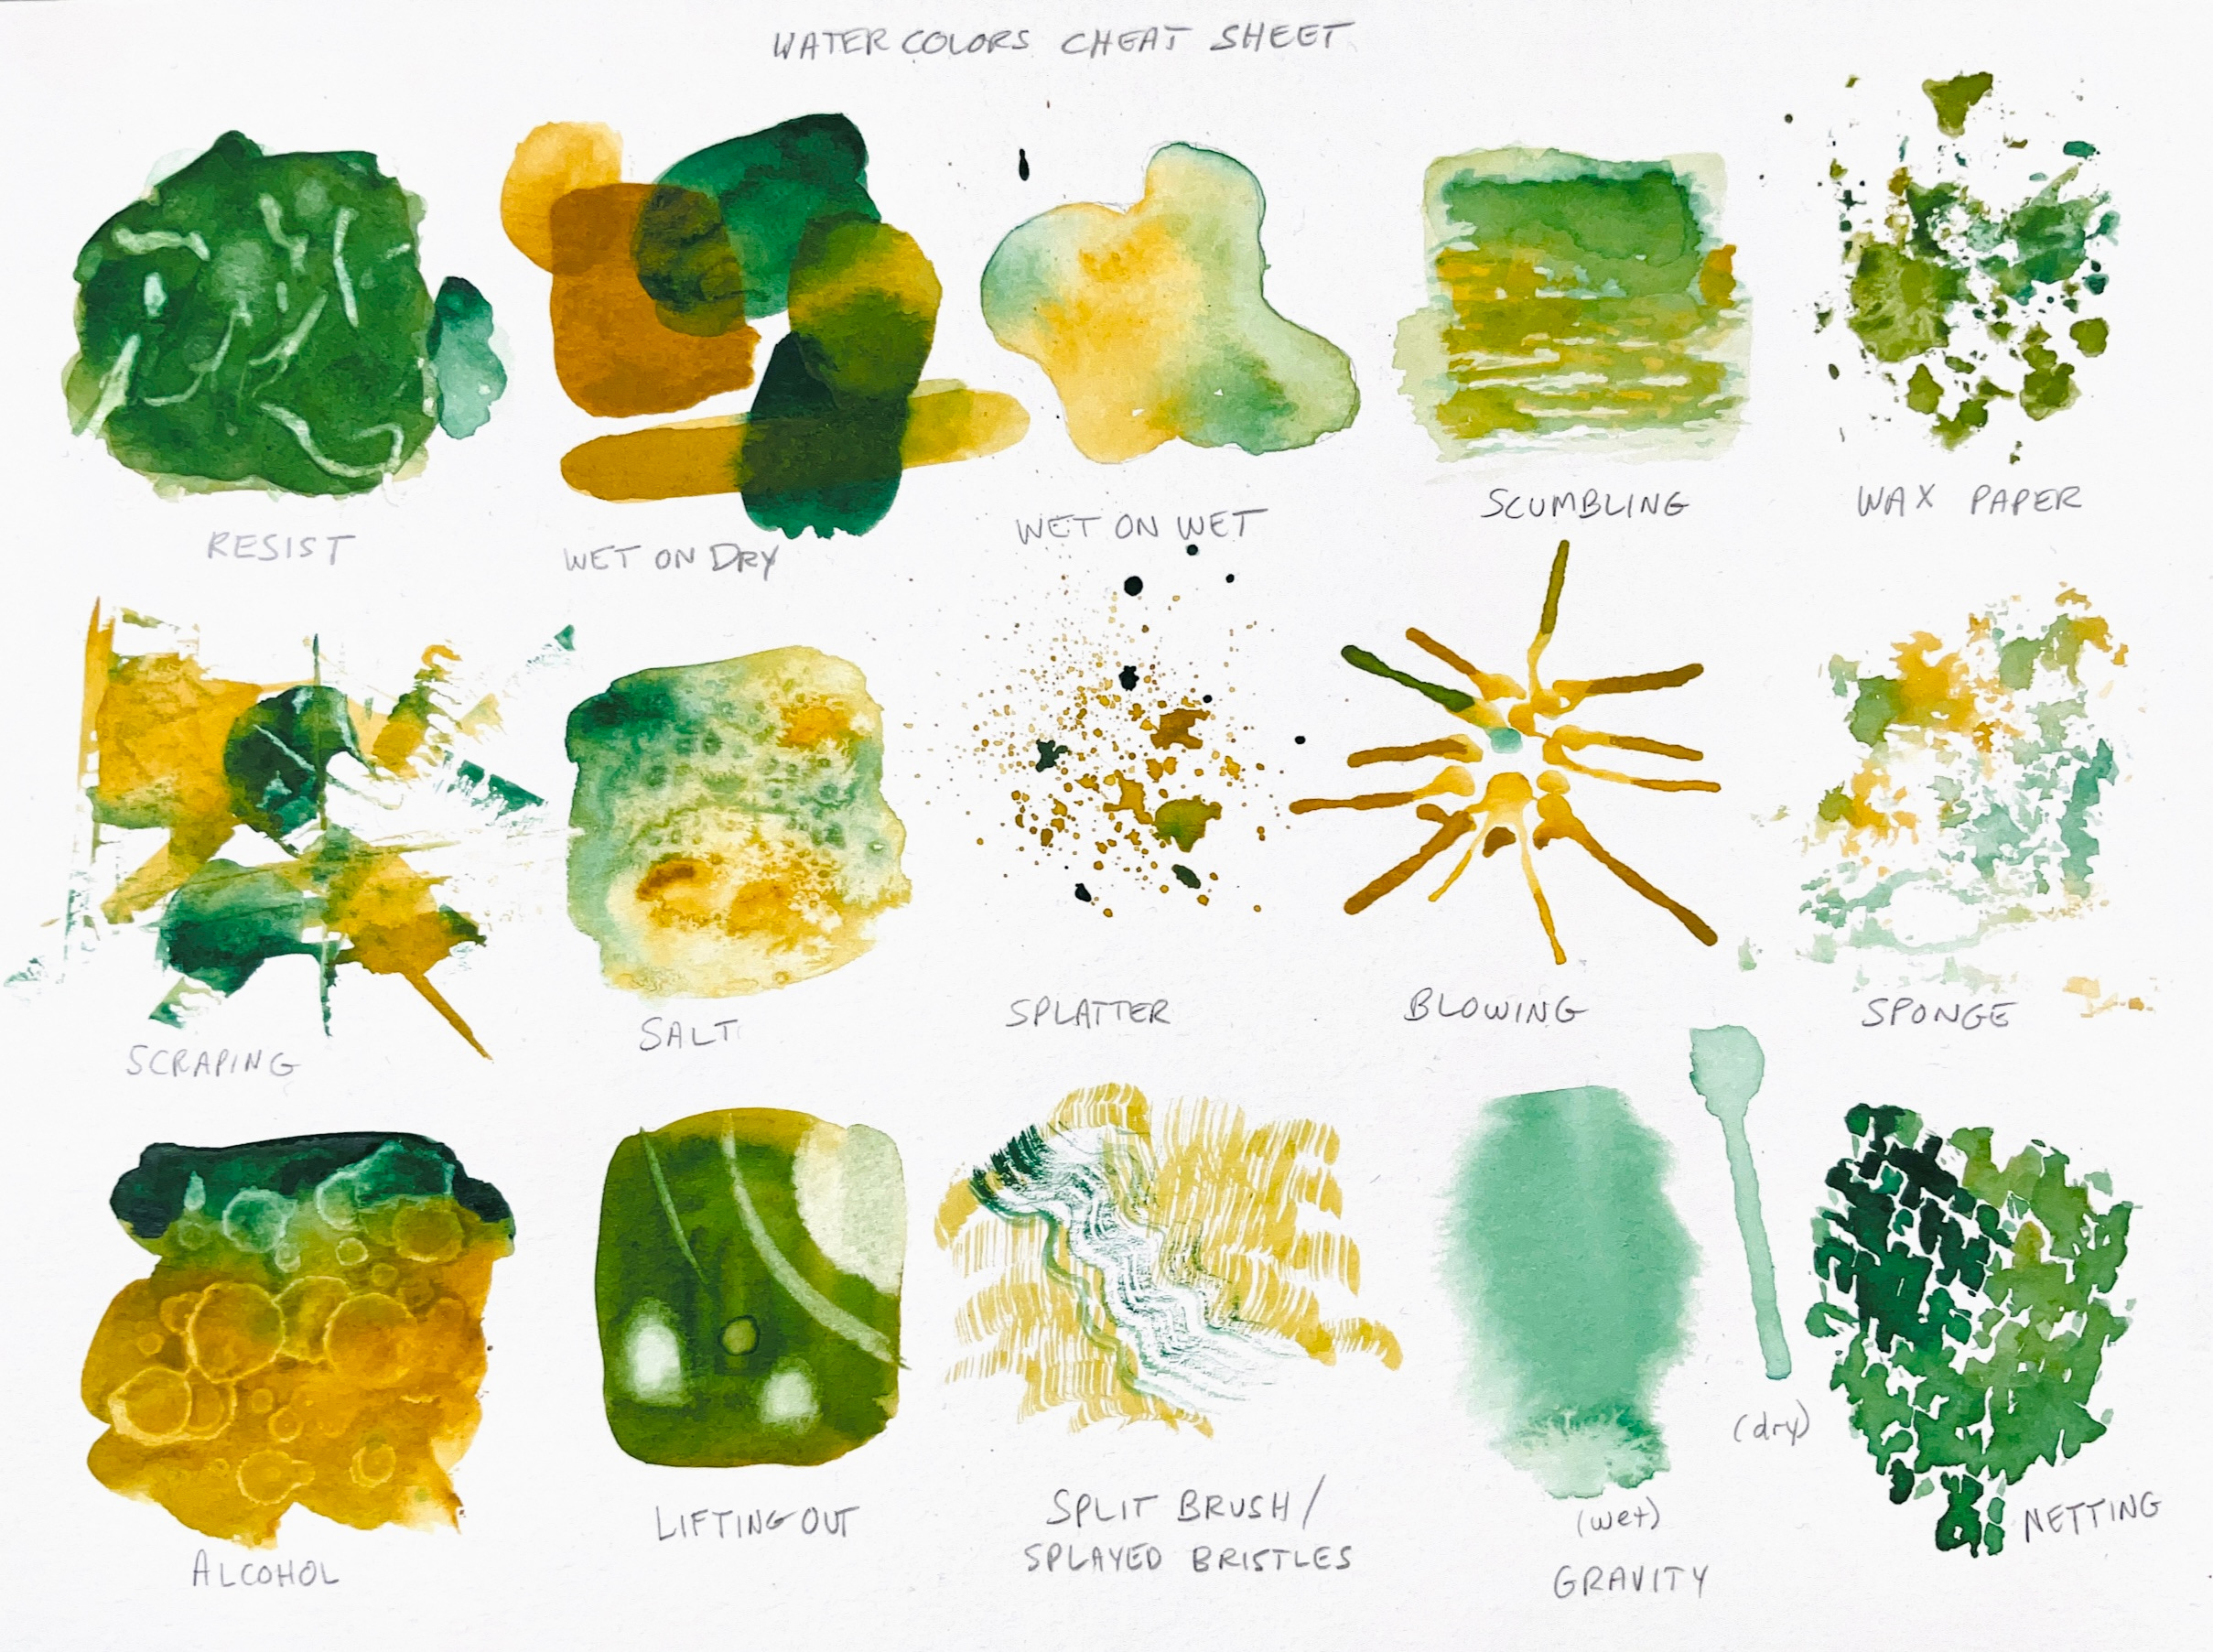
Watercolors Cheat Sheet
Basic watercolor techniques worksheet—free premium lesson.

This premium post is being offered for free to readers of Artist’s Cheat Sheet. Please consider supporting this work as a paid subscriber (tap button below) if you can, which helps make these newsletters available to all, including those who cannot afford to pay. Thanks!
This week I had the pleasure of teaching a group workshop at someone’s home. The host, Linda, asked that I teach my “Watercolors Cheat Sheet” lesson, which is how I begin every watercolor course (and which is where the name of my newsletter comes from). Here’s a review of what we discussed, and how you can do the activity at home!
Our objective is to see that watercolors can be applied in a wide variety of ways using a brush or by other methods, resulting in varied kinds of textures and marks.
Prepare materials
Prepare by gathering materials and selecting two, contrasting colors to use. Don’t use black or anything nearly that dark, and avoid pale colors like yellow. For materials you’ll use watercolors, a pointed round brush (about size #12), a palette, rag, 9 x 12 inch cold press (textured) watercolor paper (like Strathmore 300 or 400 series), a pencil, water cup, and a few other special items mentioned below.
Watercolors Cheat Sheet, step by step
Resist. Watercolors are transparent, and sometimes we need to use a mask like removable liquid masking fluid, masking tape, or wax to prevent paint from sticking to small areas of paper we would like to keep light. I used Winsor & Newton permanent mask but had trouble with it not being as water resistant as I wanted, and I had to wash away the paint that stuck to it using the brush tip.
Wet on dry. Paint small swatches and allow them to dry. Come back later and overlap them with other colors. New, darker colors will form where the swatches overlap.
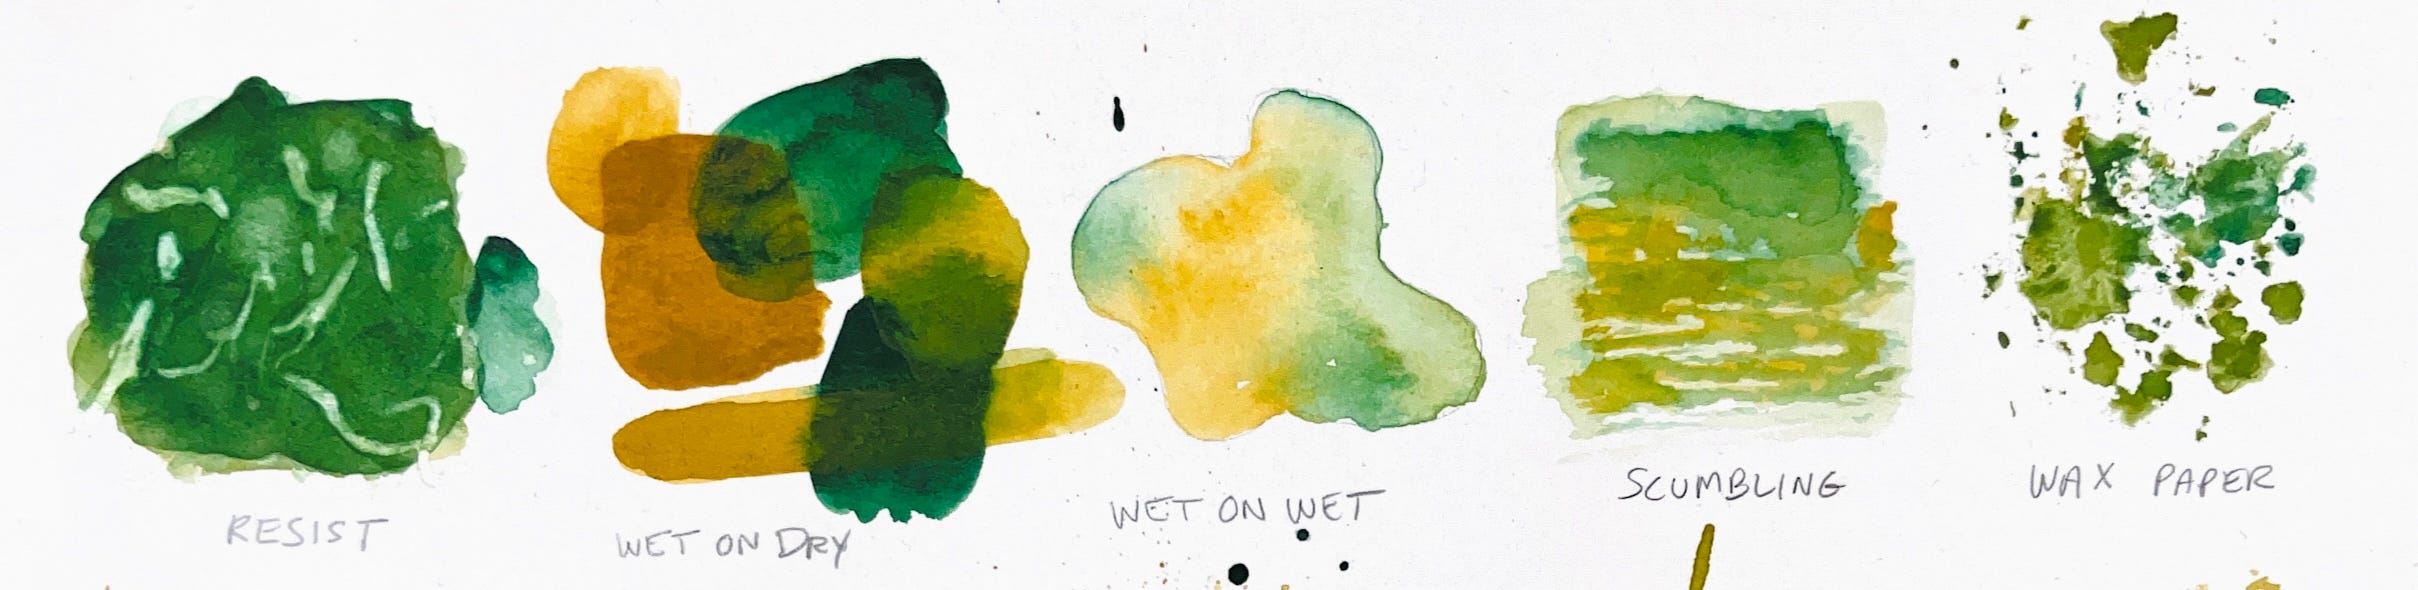
Wet on wet. Dampen an area with clean water (this is called laying a wash), then touch the tip of a brush loaded with color into it, and watch the color softly spread. A crisp edge will form at the edge of the wash.
Scumbling. With a relatively dry round brush flat on its side, scuff the paper with a side-to-side motion, barely touching the surface with the side of the bristles (you should hear a scratchy noise). Paint will stick only to the high textures of the paper, leaving gaps.
Wax paper. Paint a scrap of plastic wrap or wax paper, and when the colors bead up, invert and press the wax paper to the painting surface.
Scraping. Place blots of color with spaces left between them on the paper. Use an old gift card to scrape through and move the wet paint. Lift and change directions several times. Leave gaps, otherwise everything will mush together.
Salt. Sprinkle salt into wet color, and watch the hygroscopic process shift the water and pigment around.
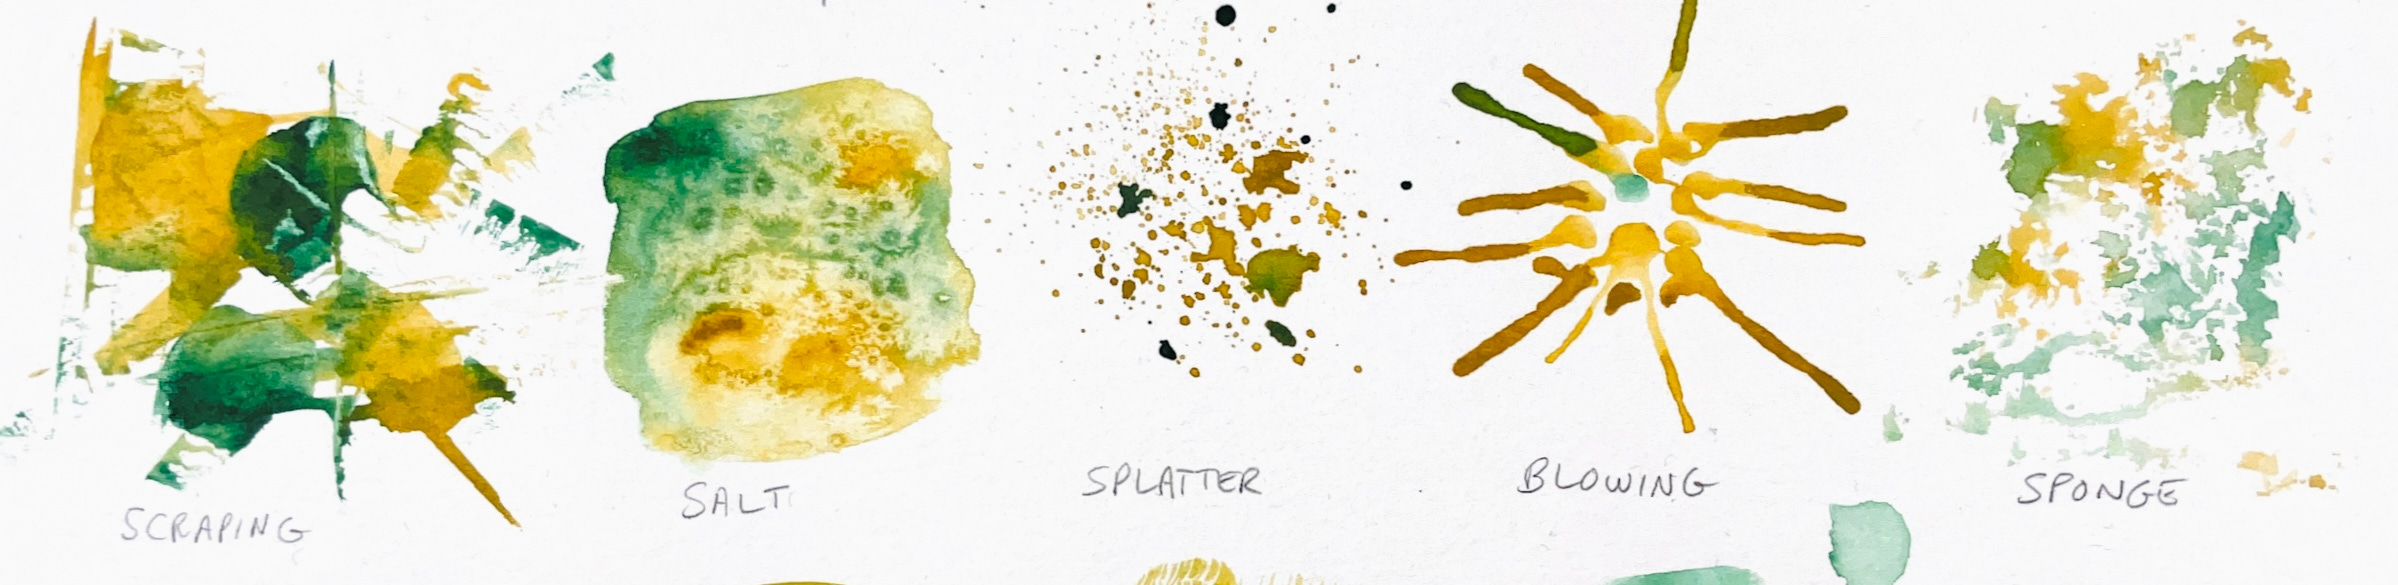
Splatter. Load a brush with color then lightly tap the handle on your knuckle, or flick the bristles across the handle of another brush to create splatter marks.
Blowing. Blow sharply through droplets of color on the paper surface. Change direction to achieve different effects.
Sponge. Use a natural sponge (beauty aisle in the market) that has been dampened to lift color from the mixing palette, then transfer to your paper. Use different sides of the sponge for varied texture.
Alcohol. Drip isopropyl alcohol into wet paint for a lichen effect.
Lifting out. Lay down a patch of color, then immediately press a clean towel into it to lift color out. Try lifting color with a clean brush. Once dry, try to re-dissolve and lift color with a clean, damp brush and towel.
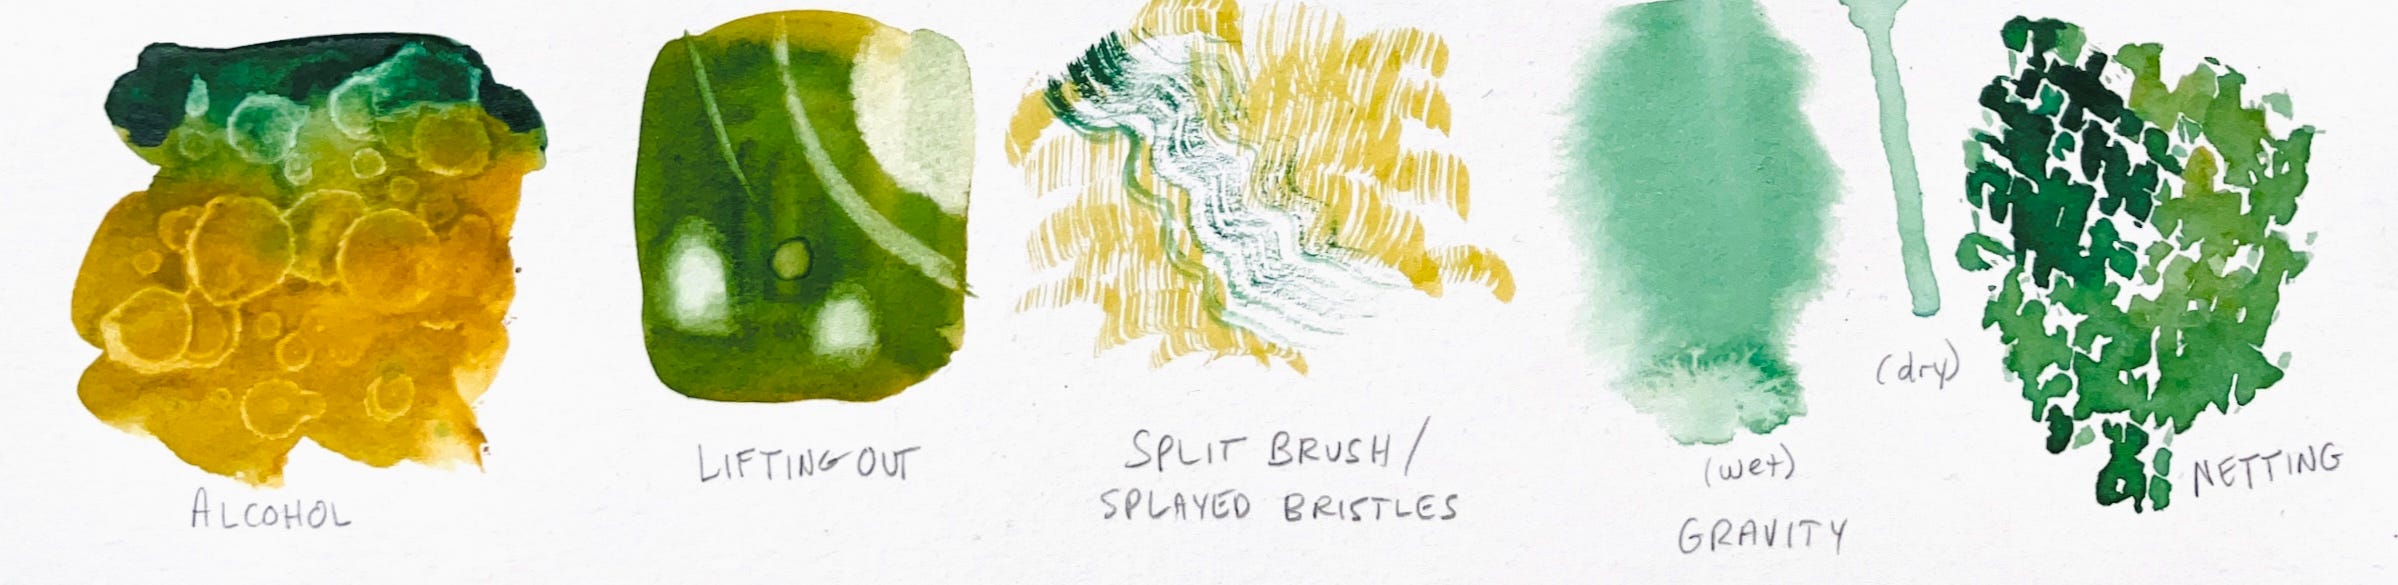
Split brush. Spread out the bristles of a lightly dampened round brush with your fingers; multiple marks will form with one pass of the brush.
Gravity. Hold the paper vertically and drop paint onto a dampened section. Try again on dry paper.
Netting. Save plastic netting from a bag of onions or oranges. Stretch it across the paper and paint though the gaps.
More watercolor tips
- has an excellent Substack called Paint Here (subscribe with my referral link) as well as a YouTube channel, books, and Gumroad instructional videos which you’ll find at his website. I also run his Facebook painting group.
Brands of watercolors: For my demo I used a cake style or pan style watercolor from Germany called Pelikan. Winsor & Newton, QoR (from Golden Artist Colors) and Grumbacher are a few examples of other, reputable brands.
Masking fluid: Most masking fluids are removable, latex-based fluids. Once dry you can overpaint the mask; and once the paint has dried, use a rubber cement pick-up tool to gently rub away the mask. I’ve used Richeson masking fluid that years later turned the paper orange. And the Winsor & Newton permanent mask we used in this exercise didn’t quite perform as expected either (see more above).
Other watercolor properties: Some watercolors naturally granulate (like French ultramarine); others are more or less staining; more or less fade resistant (lightfastness, or LF); more or less opaque. Good brands list some of these measures on each label.
Invent your mark! Try adding more ideas to the cheat sheet. All unique marks are valid.
Tonal Value exercise. On the back of your paper (back has machine-like, less random texture), try to paint the deepest version of a color you can (more pigment, less water) in a single stroke. Use the towel, water, and palette to shift the proportion of pigment and water, making lighter and lighter strokes.
Brushstroke width exercise. See how wide of a mark you can make in a single stroke by pressing the bristles flat onto the paper, then lifting the handle vertically. Try making narrower marks and see how narrow you can go.
Painting exercise. Commit to using four or five of these techniques in a painting. You can overlay effects; experiment with how long you allow paint to dry before stacking techniques.
Digital watercolor brushes. If you’d like to capture the elusive look of watercolors on digital tablet, I am happy with the result from Adilson Farias’s watercolor brush pack for Procreate, which I bought on Gumroad.
Conclusion
Thank you for reading! I hope you found this useful. If so, please consider supporting more writing like this as a Paid Subscriber, and happy painting!